Dealing with Data Model Changes

Adapting to Data Model Changes

This section will briefly go over how to reuse and adjust components as needed even after you update the data model (e.g. You have added or removed some entity attributes). For this example we will have a very simple test entity called Car. Initially we will include the attributes 'Make', 'Model' and 'Year' and then sync and gen the data model. We create a full CRUD component from this entity, and show below how to update your components with new attributes.

Below is the 'car_crud_create' component.html file. Here you can see the div with id=AdditionalInputFieldsWrapper where all additional attributes will automatically be placed.

<div id="ComponentWrapper" class="component-wrapper">
<div id="ComponentPlaceholder" class="component_placeholder component_placeholder_data_view">
<div id="ComponentFeedback"></div>
</div>
<div id="ComponentContent" class="component-content" style="display:none">
<div class="container-fluid container-no-gutters">
<div class="row">
<div class="col-sm-6 col-md-4 col-xl-3">
<div id="MakeWrapper" class="entity-instance-input-field">
{Make}
</div>
</div>
<div class="col-sm-6 col-md-4 col-xl-3">
<div id="ModelWrapper" class="entity-instance-input-field">
{Model}
</div>
</div>
<div class="col-sm-6 col-md-4 col-xl-3">
<div id="YearReleasedWrapper" class="entity-instance-input-field">
{YearReleased}
</div>
</div>
</div>
<div id="AdditionalInputFieldsWrapper" class="row">
<!-- Fields that are included by the component, but not provided for by wrappers will be rendered here... -->
</div>
<div class="row">
<div class="col-md-6"></div>
<div class="col-md-6">
<div class="row">
<div class="col-md-6"></div>
<div class="col-md-6">
<button id="btnSave" type="button" class="btn btn-primary fullwidth mt-1">Create</button>
</div>
</div>
</div>
</div>
</div>
</div>
</div>

If you want to include them with custom bootstrap sizing and/or styles, just copy the structure of existing attribute fields, namely in the form of:

<div class="col-sm-6 col-md-4 col-xl-3">
<div id="AttributeNameWrapper" class="entity-instance-input-field">
{AttributeName}
</div>
</div>

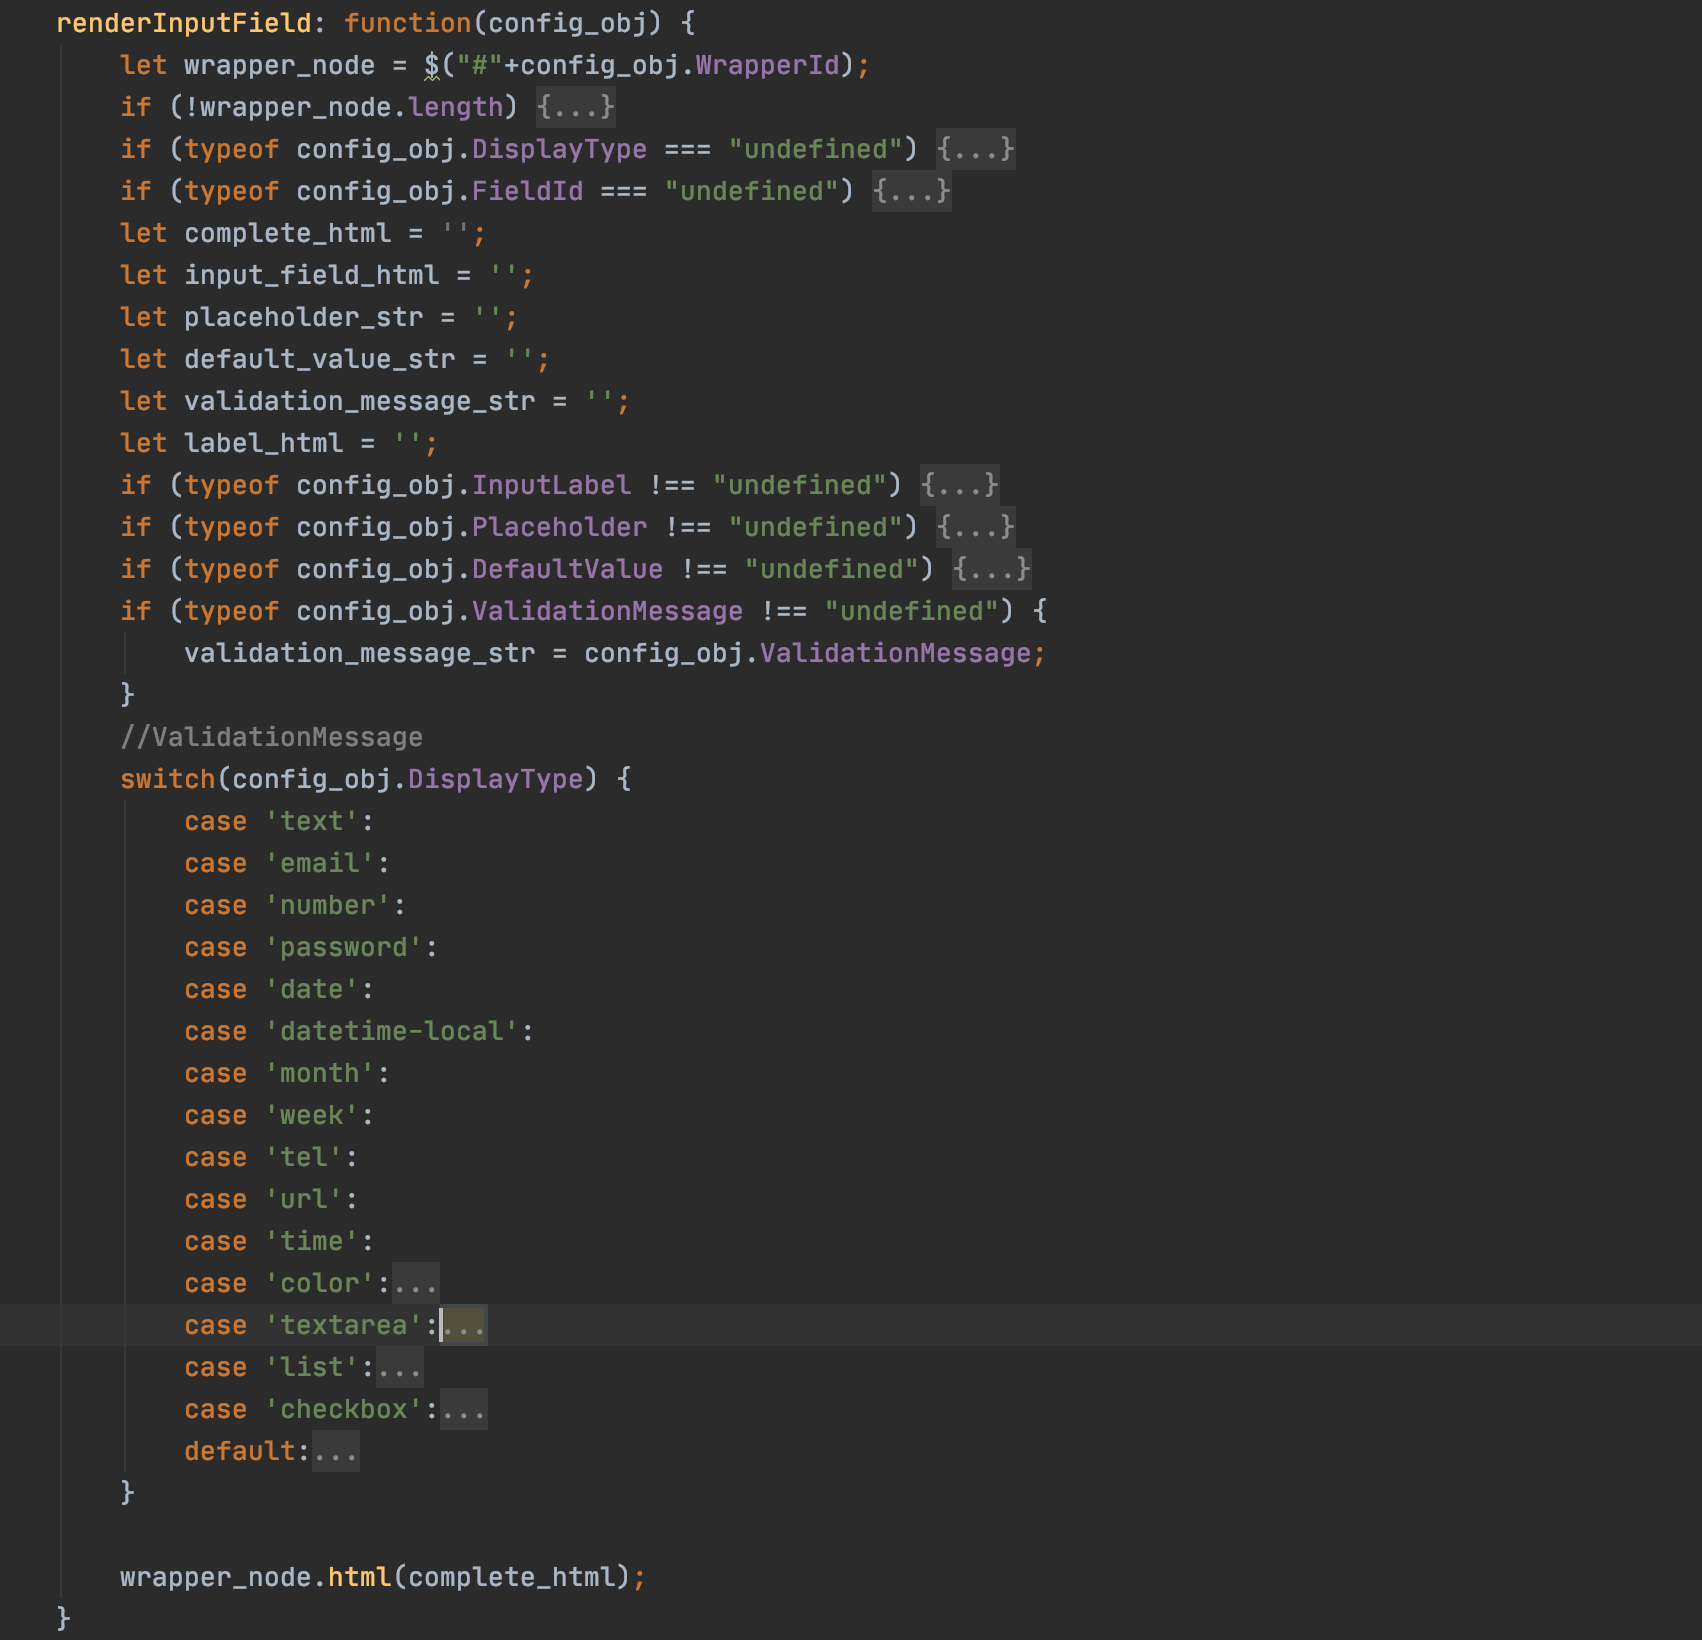
Where you replace the '{AttributeName}' token as well as the div id with the relevant attribute name (In our case it will be "Weight"). You can also then add CSS classes as needed. Any remaining included attributes without token placeholders will be placed in the AdditionalInputFieldsWrapper section. The final step would be to customise the way dxRenderer actually displays attribute fields in the DOM. By default it will create the input field based on the data type of the attribute. But, there are many data types available. Below is a screenshot of the renderInputField method of the dxRenderer object. The case statements are all possible input types, which the developer can manipuate as they like.

Create Component

Let's use an example. Let's say we know that all the cars on our system are released between the years 2010 and 2020. We want to restrict a user from being able to select a date in the 1200s for example. This is done in the file entity_definition.json located at project/assets/configurations/data_model/entity_definitions.json.

The generic process is as follows:

  1. Define any lists you will be using in the file data_lists.json located at project/assets/configurations/data_model/generated/data_lists.json
  2. Refer to the file entity_definitions_base.json (which is generated by Divblox) to see the structure of entity definitions.
  3. Copy the entity's definition you would like to override into entity_definitions.json and make the necessary modifications.all
note

Do not edit in the base file as this will be regenerated every time you synchronise the database.

Customising the full CRUD component wrapper

This section will briefly discuss how Divblox handles CRUD component interactions. When you create a full CRUD component in the component builder, this creates an inherently linked set of 4 components:

  1. The CRUD_create component
  2. the CRUD_update component
  3. The CRUD_data_series (or data_table) component
  4. And a wrapper to house them, as well as relevant buttons and links.

Deleting any of the children components will break the wrapper component. If you need individual components, you can create them as such. If, for example, you just want to remove the CRUD_create component, you can also do so, but there are a few things to notice.

Firstly, you can go ahead and delete your CRUD_create component. Then you need to do some cleaning up. The highlighted code below signifies sections we will be removing.

  1. Remove the "Create" button as well as the div wrapper for the CRUD_create component from the wrapper CRUD component HTML.
<div id="ComponentWrapper" class="component-wrapper">
<div id="ComponentPlaceholder" class="component_placeholder component_placeholder_general">
<div id="ComponentFeedback"></div>
</div>
<div id="ComponentContent" class="component-content" style="display:none">
<div class="container-fluid">
<div class="row mt-n4 crud-component-wrapper-data-list">
<div class="col-12 col-sm-12 col-md-12 col-lg-12 col-xl-12">
<div id="data_series_wrapper" style="display:none;">
<div id="data_series"/>
<div class="row">
<div class="col-md-4"></div>
<div class="col-md-4">
<button id="button_create" type="button" class="btn btn-outline-primary fullwidth mt-1"><i class="fa fa-plus" aria-hidden="true"></i> Car</button>
</div>
</div>
</div>
<div id="data_update_wrapper" style="display:none;">
<div class="row">
<div class="col-md-4">
<button id="button_update_back" type="button" class="btn btn-link crud-component-back-button-data-list"><i class="fa fa-long-arrow-left" aria-hidden="true"></i> Back</button>
</div>
<div class="col-md-4"></div>
</div>
<div id="data_update"/>
</div>
<div id="data_create_wrapper" style="display:none;">
<div class="row">
<div class="col-md-4">
<button id="button_create_back" type="button" class="btn btn-link crud-component-back-button-data-list"><i class="fa fa-long-arrow-left" aria-hidden="true"></i> Back</button>
</div>
<div class="col-md-4"></div>
</div>
<div id="data_create"/>
</div>
</div>
</div>
</div>
</div>
</div>
  1. Remove any orphaned JavaScript functionality relating to the CRUD_create component.
if (typeof component_classes['data_model_car_crud'] === "undefined") {
class data_model_car_crud extends DivbloxDomBaseComponent {
constructor(inputs, supports_native, requires_native) {
super(inputs, supports_native, requires_native);
// Sub component config start
this.sub_component_definitions = [
{
"component_load_path": "data_model/car_crud_data_series",
"parent_element": "data_series",
"arguments": {"uid": this.getUid() + "_car_crud_data_series_component"}
},
{
"component_load_path": "data_model/car_crud_update",
"parent_element": "data_update",
"arguments": {"uid": this.getUid() + "_car_crud_update_component"}
},
{
"component_load_path": "data_model/car_crud_create",
"parent_element": "data_create",
"arguments": {"uid": this.getUid() + "_car_crud_create_component"}
}];
// Sub component config end
}
reset(inputs, propagate) {
super.reset(inputs, propagate);
this.toggleSubView("data_series_wrapper");
}
eventTriggered(event_name, parameters_obj) {
// Handle specific events here. This is useful if the component needs to update because one of its
// sub-components did something
switch (event_name) {
case 'car_crud_create_clicked':
this.toggleSubView("data_create_wrapper");
getRegisteredComponent(this.getUid() + "_car_crud_create_component").reset();
break;
case 'car_clicked':
this.toggleSubView("data_update_wrapper");
getRegisteredComponent(this.getUid() + "_car_crud_update_component").reset(parameters_obj.id, true);
break;
case 'car_created':
case 'car_deleted':
case 'car_updated':
case 'car_crud_back_clicked':
this.toggleSubView("data_series_wrapper");
getRegisteredComponent(this.getUid() + "_car_crud_data_series_component").reset();
break;
default:
dxLog("Event triggered: " + event_name + ": " + JSON.stringify(parameters_obj));
}
// Let's pass the event to all sub components
this.propagateEventTriggered(event_name, parameters_obj);
}
registerDomEvents() {
getComponentElementById(this, "button_create").on("click", function () {
pageEventTriggered("car_crud_create_clicked", {});
});
getComponentElementById(this, "button_create_back").on("click", function () {
pageEventTriggered("car_crud_back_clicked", {});
});
getComponentElementById(this, "button_update_back").on("click", function () {
pageEventTriggered("car_crud_back_clicked", {});
});
}
toggleSubView(view_element_id) {
// Remove data_create_wrapper from the view_array
let view_array = ["data_series_wrapper", "data_update_wrapper", "data_create_wrapper"];
getComponentElementById(this, view_element_id).fadeIn("slow");
view_array.forEach(function (item) {
if (item !== view_element_id) {
getComponentElementById(this, item).hide();
}
}.bind(this));
}
}
component_classes['data_model_car_crud'] = data_model_car_crud;
}

And that is it! You can use similar logic to remove the update component or further customise the CRUD to your liking.