Other Common Examples
Common Examples
Update the look and feel
The aesthetics of a page is primarily controlled by CSS.
- Editing the way a page looks can be done by first opening "UI configuration" from the Divblox setup page.
- Either add new CSS class, or edit the existing ones, inside "theme.css". To view the statements click the "bi-directional arrow" to expand the code folds.
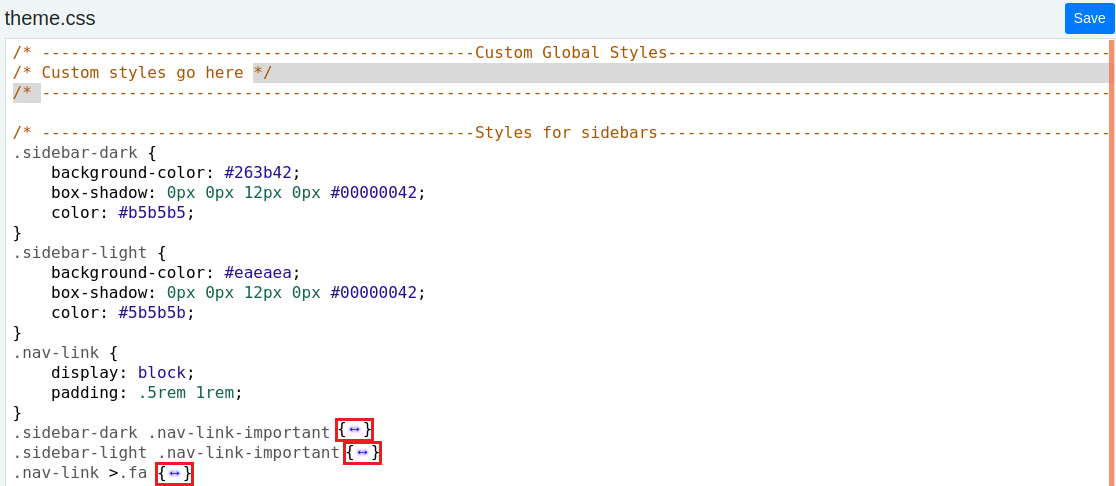
- By using these classes we can change the look of a certain item. When a component is placed on a page, it calls the CSS class from its HTML script. For instance inside the "side_navbar" component's HTML tab, and inside the HTML "navigation tag" is where the CSS class is referenced. Changing this will result in style changes to the navigation bar.

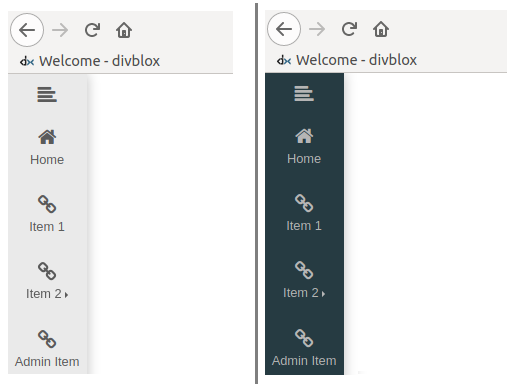
- Using the CSS classes in "theme.css", the navigation bar can be changed from dark to light using the classes "sidebar-dark" or "sidebar-light".
Adding Custom fonts to your project
In this example we will add a new font to our project and then have that font present for offline applications as well.
Start by finding a font for your project. This example will add Google's fonts as they're free to use and easily accessible. See here.
Once you've chosen the font that will work, select it by clicking the " + " in the corner of the font tile.
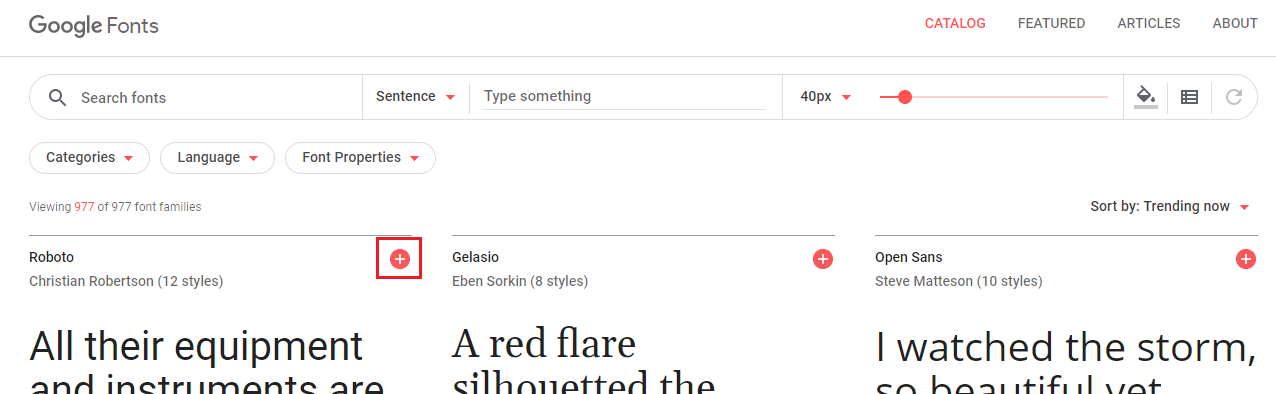
- By selecting it, a window should open in the bottom right of the page containing a link that could normally be added to your HTML header, but if you want to export your application to a native environment, or even just to have it functioning offline, the CSS and font files will need to be added manually.
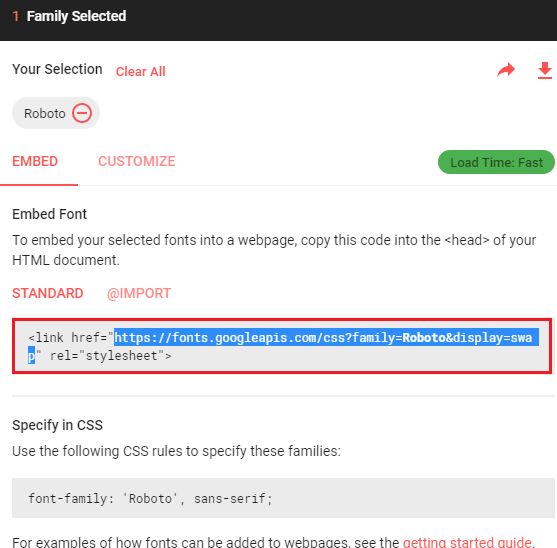
- By opening the link in the HTML snippet in a new tab, we can see the font's CSS code.
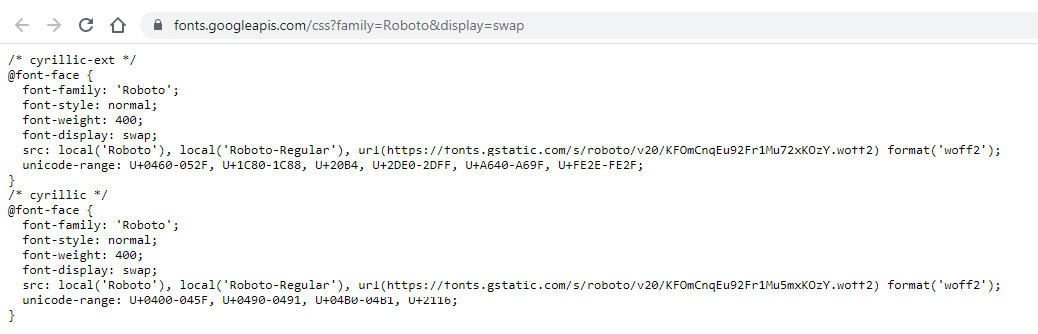
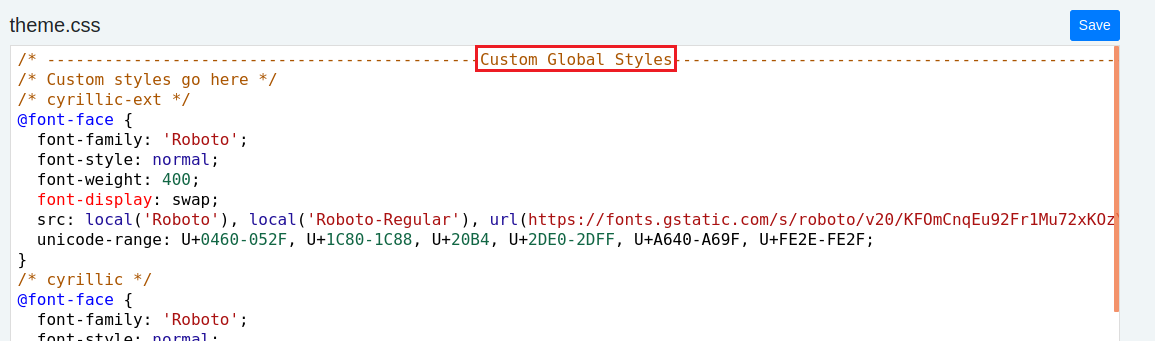
- The fonts can now be placed into your project by copying the CSS code and pasting it in the "Custom Global Styles" section found at the top of the "UI configuration" in the "theme.css" file in the Divblox setup.
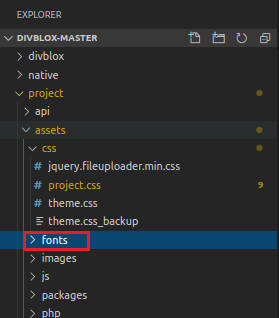
- You have now added a custom font to your project, but this is only going to work for online apps that are able to retrieve the font files. To have a native app the font files need to be downloaded. To get these files copy the URL of the font file, which is found in the CSS code that was just copied, into a new browser tab. Opening the URL will start the download of the file. This should be saved in "divblox-master/projects/assets/fonts". Repeat this step for all the file links found in the CSS code that was copied as the links are all unique.

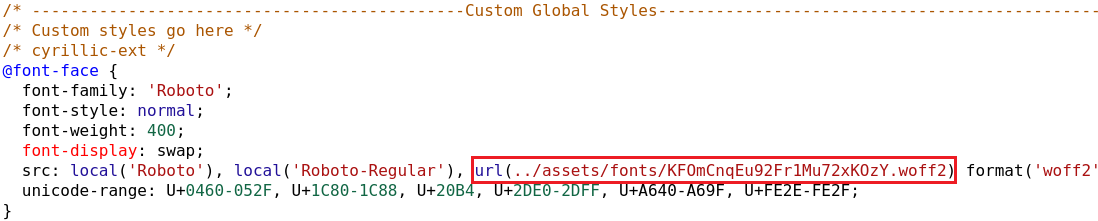
- The saved files need to be linked to the CSS code. Rather than having the URL to the file, it can be replaced with :
- Your project should have locally stored fonts. Remember to save the UI configuration before moving on.
Global variables for non-SPA apps
A benefit of having a single page application (SPA) is that the variables that are defined keep their value when the page refreshes. This is because the user side the application is rewriting the same page instead of receiving new pages from a server. This ability to maintain your variable values between pages is lost when designing a non-SPA app. The solution Divblox has incorporated are global functions that can store and retrieve variables. These functions can be found in "/assets/js/divblox.js".
Changing the logo
For a standard web app
For a standard web app or site changing the main logo and icon can be done by:
- Opening the "UI configuration" tile on the Divblox setup page.
- Drag and drop your logo or icon of choice into the upload areas.
- Divblox updates the logo upon adding the new image.
- Opening up a page with the logo on it will show that it has been updated.
For a progressive web application
A progressive web application (PWA) is one that behaves more "app-like" by having features such as being independent of connectivity, can be installed to a home screen and have push notifications.
Since these applications can be placed on a home screen the app requires features that are outside of a app's pages, meaning that it will have both a launch icon and a splash page that gets displayed when the app is launched.
- The icon can be set by changing the name of icon you have to that of the default icon, this way your logo will be loaded in. First, in "manifest.json" are the names for the app icons. Change the name of the images that you want to add to match these so that they can be used.
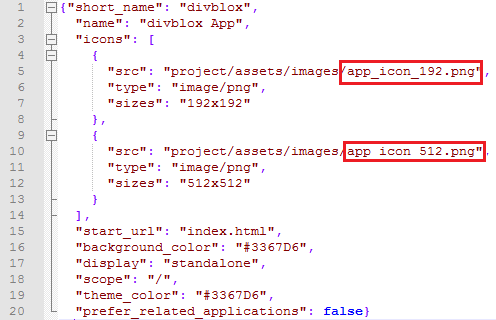
- Place the images inside your projects image folder, "/project/assets/images".
3) The splash page is changed similarly. In the "index.html", inside of the header are all the file paths to the splash page and mobile application launch icons. Change the names the images that you have to match the name of the images used in this file. Place your images in "/project/assets/images".

note
Do not change the file paths in "manifest.json" and "index.html" to match your images.
Displaying your logo
Displaying your application's logo on a page is done by simply adding the "app_logo" class into your HTML file where you need it to be displayed.
- The following HTML line is used to place the logo on your page.
A way of adding it to a container is to start by opening the component you want to have a logo on in the "Component Builder".
In a row of a container click " + Add Component"
Click "Add Custom Html" to insert the code for the logo into the container.
- Add in the line, that includes the logo from step 1, into the HTML section.
- Save and close to view the page. The logo should now be present in the container that was just created.
- By inspecting the new item we can see that it uses the "img-fluid" class, meaning the logo will adjust to the container's width when the original image's width is larger than that of the container's width, otherwise it will remain the same size as the original image.
User Profile image
This example will focus on placing the user profile image on any page.
Choose and open a page in the "Component Builder".
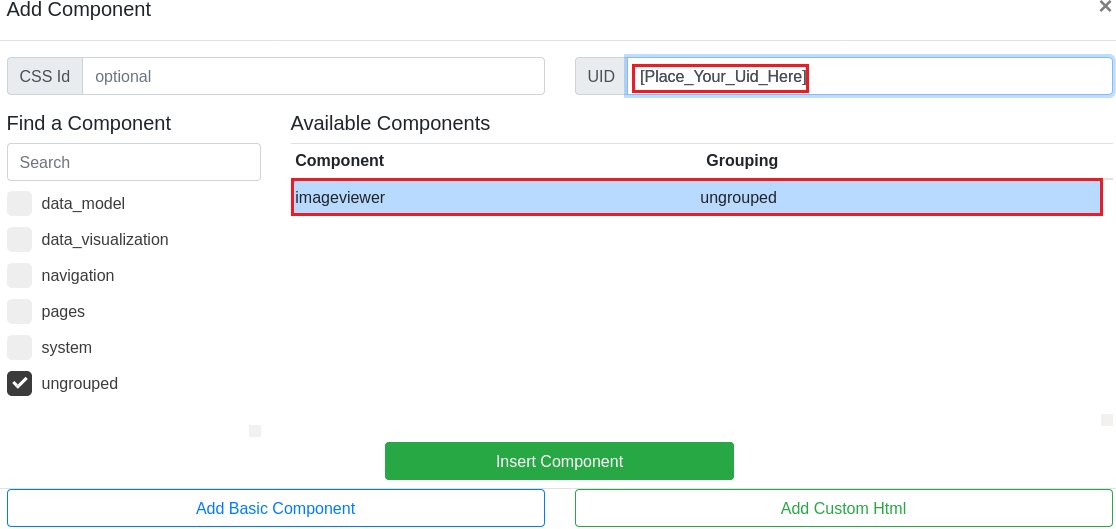
Inside a container on the page, place a new component. Find and select "imageViewer". Before adding the image viewer to the page it will need a unique identifier, or "UID", so that it is identifiable and when placing the profile picture in it, it won't disrupt other image viewer components on the page.
- Create the image viewer and take note that there is no image to be viewed.

- Edit the page and open the "Js" tab. You'll be able to see the "imageViewer" has been loaded in as a "sub-component". To add the profile picture to the viewer as the page is loaded we use "subComponentLoadedCallback()" which is called when each of the sub-components on the page have been loaded. In this function we can check for a specific UID to select a specific sub-component from the page, and then get the current user's profile picture path and update the image viewer's image.
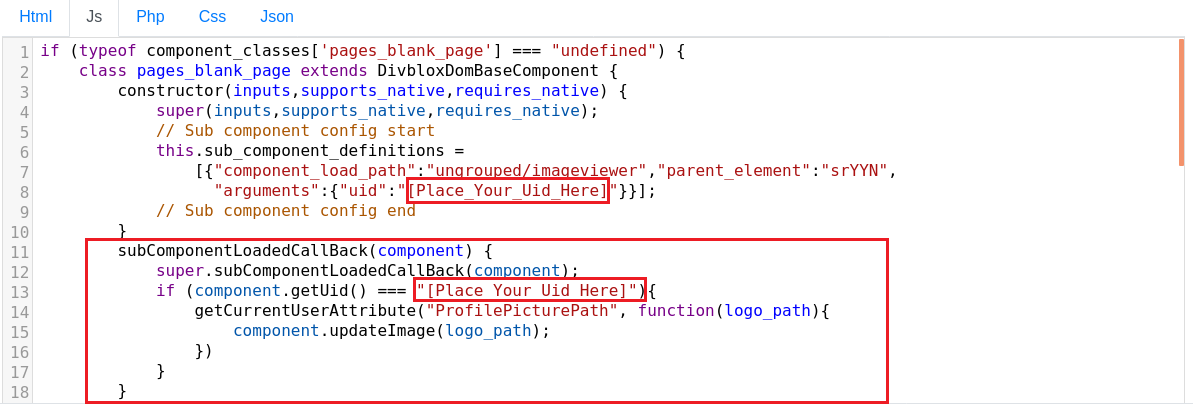
- Save and reload the page. The user profile picture has now be loaded into the image viewer as the page loads.
Sending an email
Divblox implements PHPMailer (https://github.com/PHPMailer/PHPMailer) to send emails. Divblox will automatically log all email sending activity in a table called EmailMessage. Therefore, it is important to ensure that your database is correctly set up and you have done a synchronization on the data model before continuing.
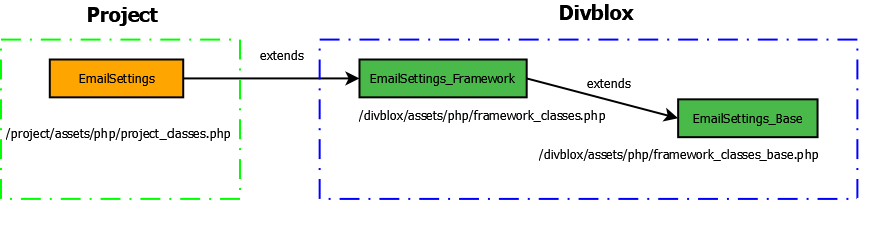
Before sending emails you need to configure your email settings within Divblox. Fill in the necessary parameters in the EmailSettings class located in the file /project/assets/php/project_classes.php.
We are overriding the default parameters set in the
EmailSettings_Baseclass. This is part of the Divblox best practices, as your changes to Divblox base files may be deleted as Divblox replaces the files with updated ones.
The chain of inheritance is as follows:
For some email servers such as Gmail, security protocols are expected. For the above Gmail example, TLS is mandatory and hence we can either set $SMTPAutoTLS = true; which will always set the security protocol to TLS, or we can define which protocol to use,
$SMTPSecure = \PHPMailer\PHPMailer\PHPMailer::ENCRYPTION_STARTTLS; and then force the protocol to match the previously defined one, using $SMTP ForceSecurityProtocol = true;
We are now ready to use the EmailManager class to prepare and send emails.
- Prepare your email with
EmailManager::prepareEmail("Test Subject", "A test message"); - Add one or multiple recipient addresses with
EmailManager::addRecipientAddress("recipient.address@gmail.com", "Recipient Name"); - Optionally, add CC addresses with
EmailManager::addCCAddress("recipient.address@gmail.com"); - Optionally, add BCC addresses with
EmailManager::addBCCAddress("recipient.address@gmail.com"); - Optionally, add attachments with
EmailManager::addAttachment("file_path_from_root", "file_name_to_display"); - Send your email with
EmailManager::sendEmail($ErrorInfo);.$ErrorInfois a variable that is passed by reference and will result in an array that is populated with any additional information regarding the success or failure of the function.