Basic Training Exercise
This exercise assumes that you have managed to configure your divbloxPHP project and that you understand the basic concepts. If you are not sure that you do understand the basics, you can look at the common examples.
In this exercise we will go into a bit more detail about the main divbloxPHP concepts that are used in every project. These concepts include:
- Data modeling
- The divbloxPHP ORM (Object Relational Mapping)
- Interaction between a component's front-end and back-end
- Component and object security
- Exposing an API
Introduction
In this training exercise, we will be creating a basic ticketing system that will allow users to create and manage "tickets". To allow users to interact with our tickets, we will generate CRUD (Create, Read, Update, Delete) components.
Additionally, we will create the following components:
- A page where full CRUD of tickets and categories is done
- A page where we reuse the CREATE component for a ticket to allow the user to create tickets in a simple way
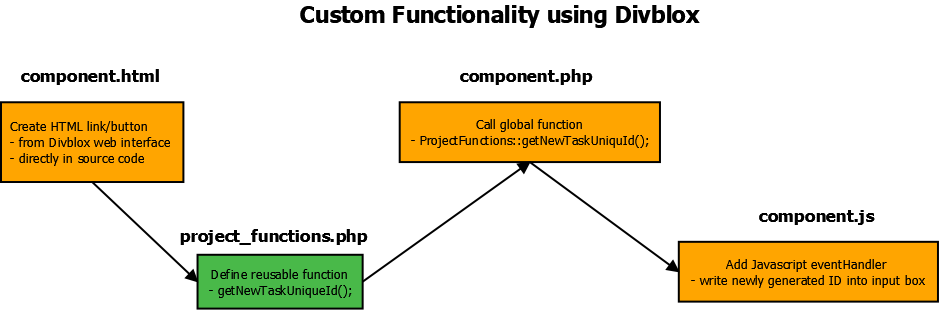
We will also be building some custom functionality to demonstrate how to communicate between the front-end and back-end of a divbloxPHP application.
Finally, we will also learn how to secure our components and data model entities, as well as how to expose our functionality via the divbloxPHP API layer.
Step 1 - Data Model
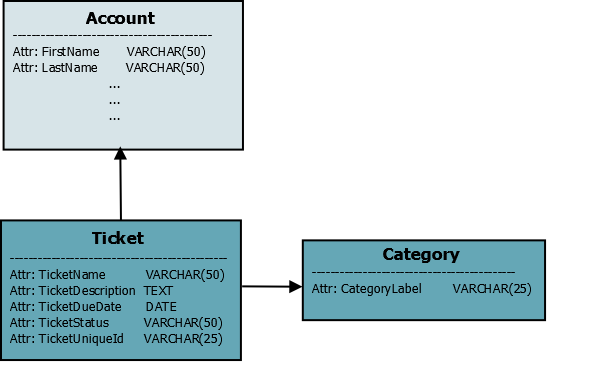
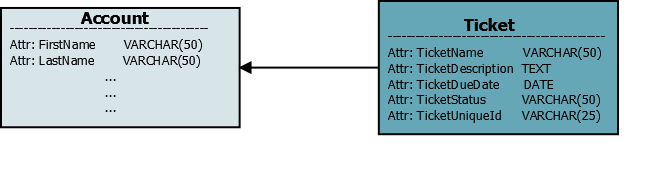
We will be creating a data model with the following entities and attributes:
- Ticket: TicketName, TicketDescription, TicketDueDate, TicketUniqueId, TicketStatus
- Category: CategoryLabel
This can be represented as follows:
If you need a refresh on divbloxPHP data modelling, click here. Below is a walk-through of how to add the necessary entities using Divblox's Data Modeller.
Step 2 - CRUD Components
Now that our data model is created and synchronized with our database,
let's generate some CRUD components (using the component builder) for Ticket and Category. Below is a walk-through of how to create full CRUD functionality for the Category entity.
And now we will create the CRUD functionality for the
Ticketentity, which although more complex, is just as easy with divbloxPHP.
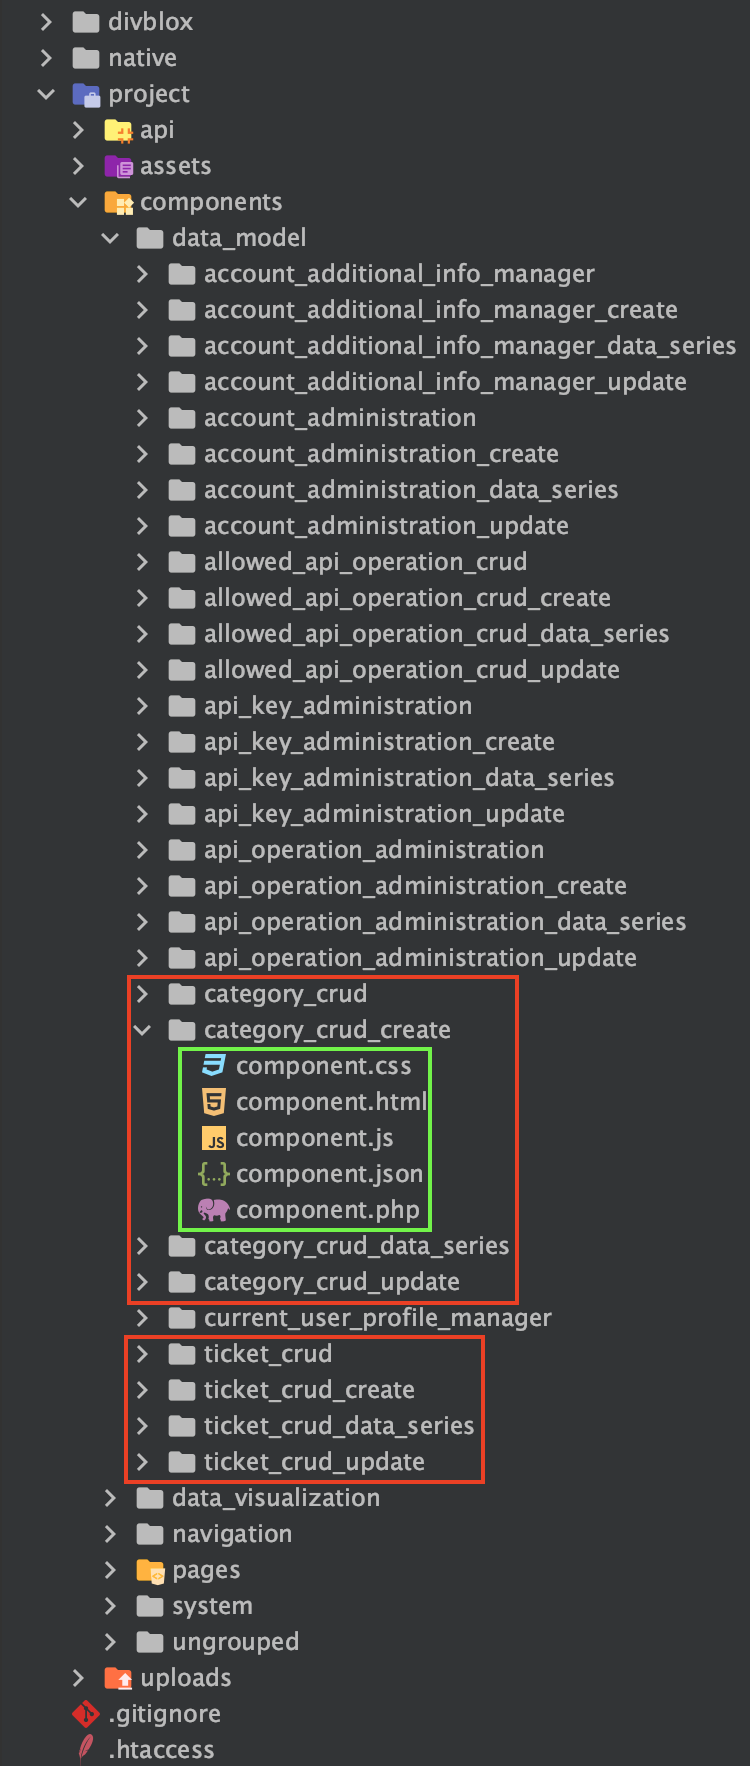
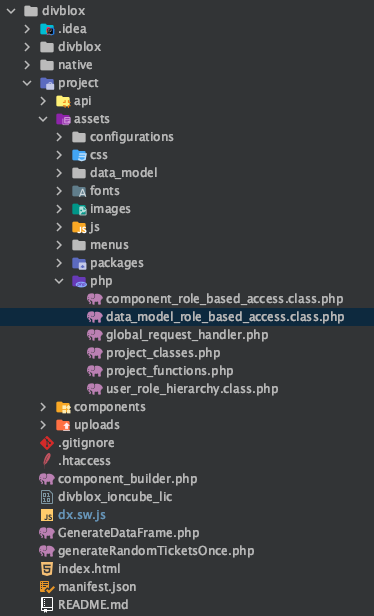
It may be interesting to note how divbloxPHP creates these components in the IDE. below is a screenshot of the component file structure after we created the CRUD components. You can see the 4 CRUD components for both the Ticket and the Category entities, with each component have independent PHP, JS, HTML, CSS and json files.
When checking the
Validatecheckbox, divbloxPHP automatically notifies the user that input is required. Further validations can be added at a later stage.
Notice that in both examples we did not tick the Constrain To checkbox. If you constrain by a certain attribute, you are filtering to see only results that satisfy that criteria. An example would be to constrain Tickets by the current user account. This will display only tickets created by the current user. These constraints can only be done with entities that have a singular relationship. Singular relationships mean that an entity instance is linked to one, and only one, instance of another entity. E.g. Each ticket can only be linked to one account at any given time.
This logic also applies when using 'create' and 'update' functionality and using the Constrain By checkbox. An example here would be to automatically link a ticket to the current user upon creation.
You may want to change the display of certain attributes, in all of the components they feature. In our example, let's say we have a set predetermined list of ticket statuses the user should be able to chose from. This can be manually done in the data_lists.json and entity_definitions.json files. A walk-through of this is shown in the below video.
Step 3 - Page Components
In order for us to be able to use our newly generated CRUD components, or any other component for that matter, we need to put them inside pages. Pages are also just components, but they can be navigated to by the user in the browser, while individual components can not.
info
A component is considered a page component when it is located in the "pages" grouping (the folder /project/components/pages/[component_name])
The pages we will build for this exercise are:
- An admin page where our full CRUD components can live
- A "New Ticket" page where users can create new tickets
To do this we will use a pre-made page template with a side navbar. As you will see, the navigation bar is pre-populated with links we will later override or delete to suite our needs.
Now we can create the 'Tickets' page where users can create tickets. Note that we are not creating any new functionality, just reusing the 'create' component previously generated and placing it on its own page.
Step 4 - Navigation bar
Ok, we now have components that allow us to create our data, as well as pages to view them on. We will now update the side navigation bar to function as we want it to. Notice how, in this video, we edit the component code in our IDE (any IDE/text editor of your choice). The preferred way is to use an IDE, but for quick fixes like changing the HTML layout of our page we can use divbloxPHP's built-in code editor. The process followed here is as follows:
divbloxPHP incorporates an easy to use seperation between the actual navigation bars and the menu items in them. The idea of this is to allow for reusabililty of the same menus and styiling throughout a project. You can access the list of menus available in your project from the Navigation bar in the setup page.
You will see the following:
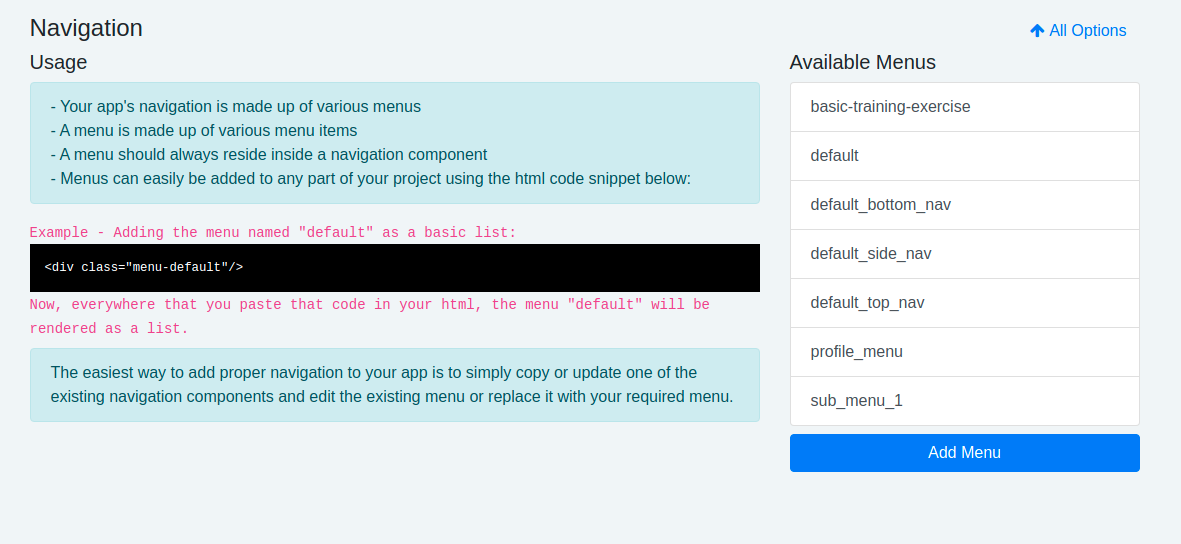
There are a few default menus, and we will create a basic-training-exercise-menu with the necessary items.
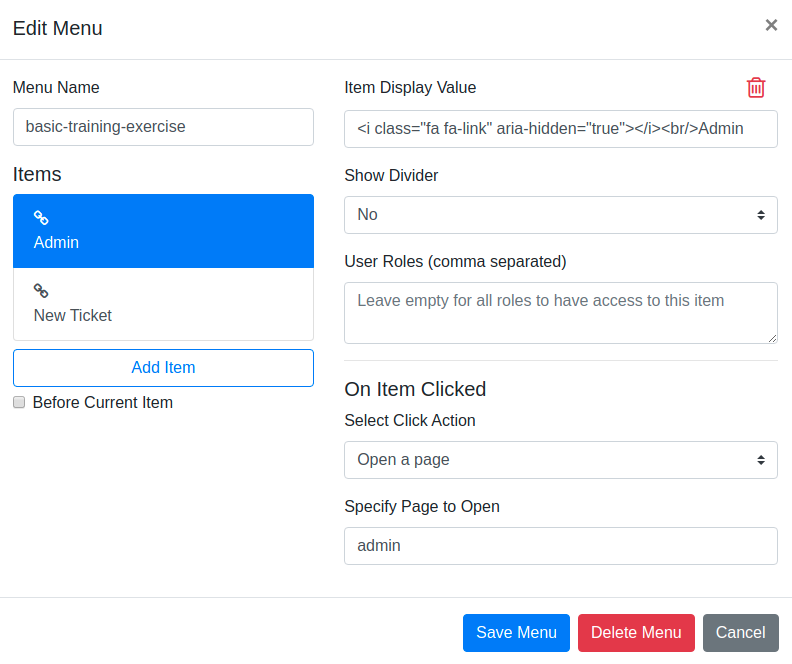
Here we add the HTML that we want to be displayed as our item, in our case we want an icon and page name. We give our two pages the following:
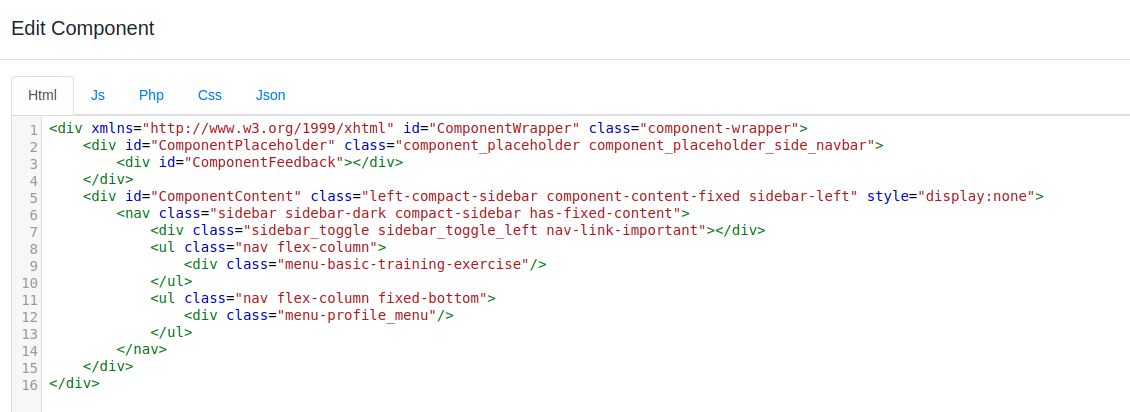
We also set the action we want to occur when clicking on the menu item to load up the corresponding page. The navigation bar component HTML looks like this:
Step 5 - Global Functions
For the purposes of this exercise, we want to assign a unique ID to every ticket. This will allow us later on to retrieve information about our ticket via an API. To generate this unique ID, we will make use of a global function call.
info
Global functions are defined for functionality that will be used multiple times, reducing code duplication
We will create the unique ID in the backend, as we need to verify whether or not it is indeed unique by checking our database.
Step 5.1 - Adding button
Add the button in our ticket_crud_create component that will generate a unique ID and populate the input box.
We can do this through the divbloxPHP Component Builder or in the source code.
Below is a video running through step 1:
Step 5.2 - Create global function
Create the global php function that will generate the unique ID in project_functions.php.
Here is the code added into the class ProjectFunctions, in project/assets/php/project_functions.php.
Step 5.3 - Call global function
Call the global function from component.php, sending information to the front end.
The code added into the ticket_crud_create component.php file is:
Below is a video running through step 2 and 3:
Step 5.4 - Add JavaScript
Add the JavaScript functionality that auto-populates the input box with the newly generated unique ID in component.js.
Below is a video of step 4:
The code added into the initCustomFunctions function was:
Step 6 - Security
It is important to understand how divbloxPHP user roles are used to control access to the application. divbloxPHP has two forms of access:
- Component access allows the user to view the components
- Data Model access gives the user permissions to perform CRUD operations on specific entities defined in the data model.
By default, there are two user roles.
- Administrator - Has access to all components and full CRUD functionality.
- User - This is the user role allocated to anyone who registers on your app. The default access is only to your profile and account.
Any user that is not authenticated is treated as "Anonymous" - No access, gets redirected to the anonymous landing page.
info
Additional user roles can be defined in the data modeller.
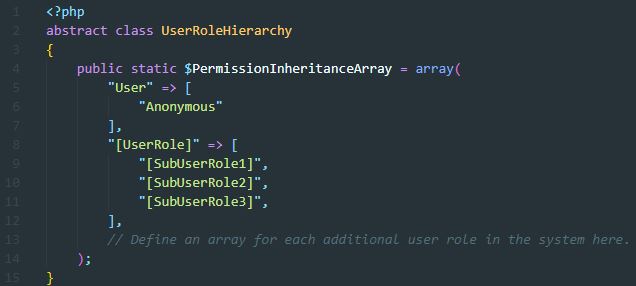
It is important to define a user role hierarchy in the abstract class 'UserRoleHierarchy' (project/assets/php/user_role_hierarchy.class.php), so as to prevent duplicate writing of components and data model access for different user types. This allows for user roles to inherit access from lower user roles, so you only need to specify what access the user role has above and beyond previously defined access.
The Component default settings are as follows:
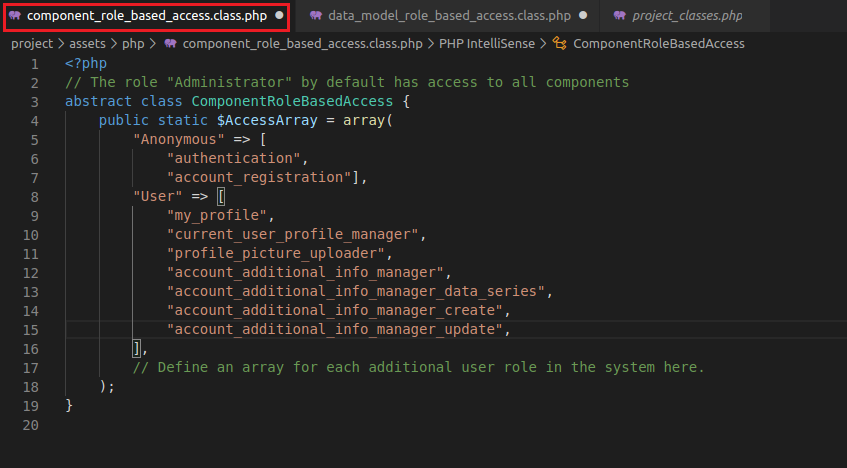
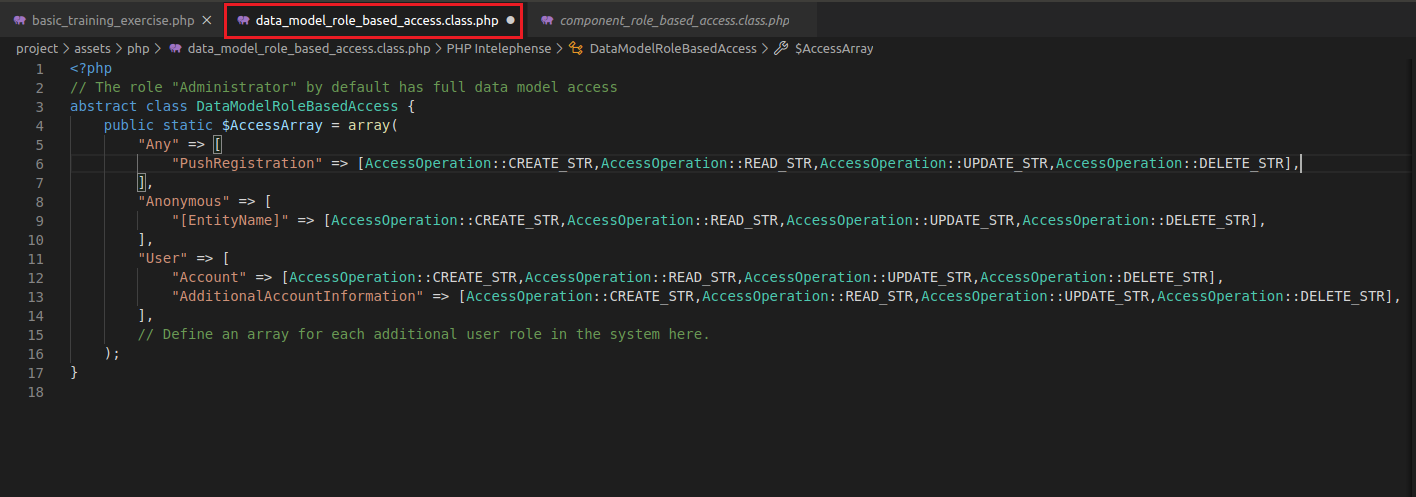
And the Data Model settings seen below. It is also important to note that by default users are able to create and read data, even if not explicitly stated in the $AccessArray.
For our exercise we created 2 pages (The 'admin' and 'new ticket' pages). Let's assume that we only want administrators to access the admin page.
You can access the register page by navigating to [your_project_root]/?view=register. New users are registered with the user role "User" by default.
note
It is also good practice to test user role access in incognito/private mode, as you are typically logged in as a divbloxPHP admin (dxAdmin) most of the time while in the component builder. dxAdmin is a superuser
As you can see, our new user is unable to view any of the pages we built. This is because he does not have component access to the components on those pages. We will change that in the ComponentRoleBasedAccessArray::$AccessArray.
In the below video we will firstly give our user full access to any Ticket and Category components. This will allow us to see how the Data Model access works (we will observe this on our admin page). Once the Data Model access is configured, we will then give our user access only to the create components of both Ticket and Category, allowing the user to view the New Ticket page, but not the admin page.
It is worth noting that this is a basic example to demonstrate how divbloxPHP handles user access. As you may have seen above, there is no need to change the Data Model access of our user to be able to update and delete as he will never be able to get to the admin page to do this.
Step 7 - Exposing an API
Now that we have all the groundwork completed, let's provide the world with an API endpoint that will allow us to do some custom functionality on our tickets. To do this, we will copy the provided api_example endpoint and modify it for our use case. The API functionality we want to achieve is as follows:
- Allow a user to provide us with an array of unique ticket IDs as input
- Select only the ticket descriptions from the tickets
- Merge all of the ticket descriptions into the first ticket (initial unique ID)
- Delete the remaining tickets
- Return the new merged ticket as output
We will be using a program called 'PostMan' to test our API functionality. It comes pre-installed on the divbloxPHP VM image. You can view their website here.
info
divbloxPHP automatically handles the routing for your API endpoint. API endpoints are available at [your_project_root]/api/[endpoint_name]
Below we will briefly explore the api_example functionality, how to navigate the URL and what the expected output looks like.
To proceed, we will create a file basic_training_exercise.php in project/api and mimic the basic structure of an API endpoint like in api_example.php. Firstly, we add an API operation with function namemergeTickets();.
In the mergeTickets(); function we code the following logic:
- check if the input is valid JSON
- check if the master unique ID exists
- check if the master unique ID is valid
- check if there are more than two IDs
- if there is more than two IDs:
- loop through the valid IDs
- perform a merging of the ticket descriptions
- delete each ticket after its description is merged
- save the results into the database
- present output to front end
The code added into our 'basic_training_exercise.php' endpoint (/project/api/basic_training_exercise.php) is the following:
Referring to the Ticket::LoadByTicketUniqueId() function that was called above: every Entity has an EntityNameGen.class.php file
where divbloxPHP generates ORM related functionality (located at /project/assets/php/data_model_orm/generated/EntityNameGen.class.php). It is a good idea to look through
these classes once your data model is synchronised with a database, and familiarise yourself with what is available.
We will briefly highlight some of this functionality for the TicketGen class specifically.
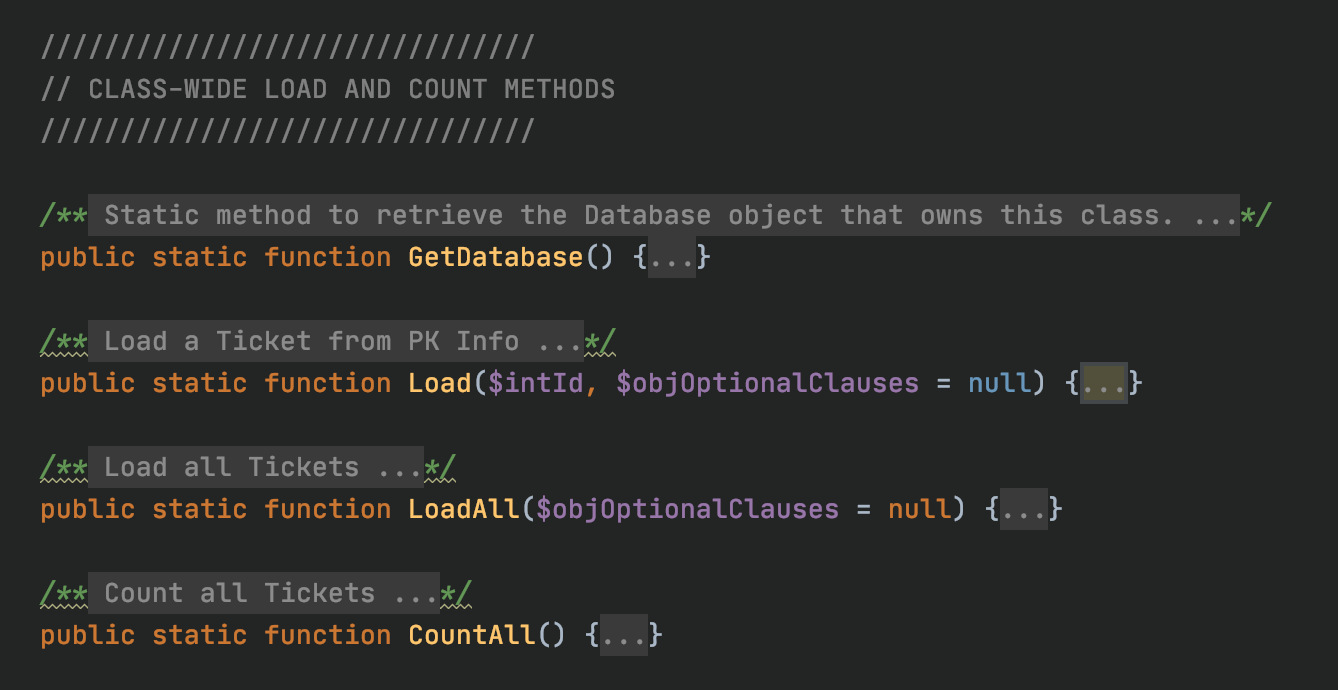
Firstly we have class wide methods which are simply wrappers for the most common dxQuery statements a developer might use.
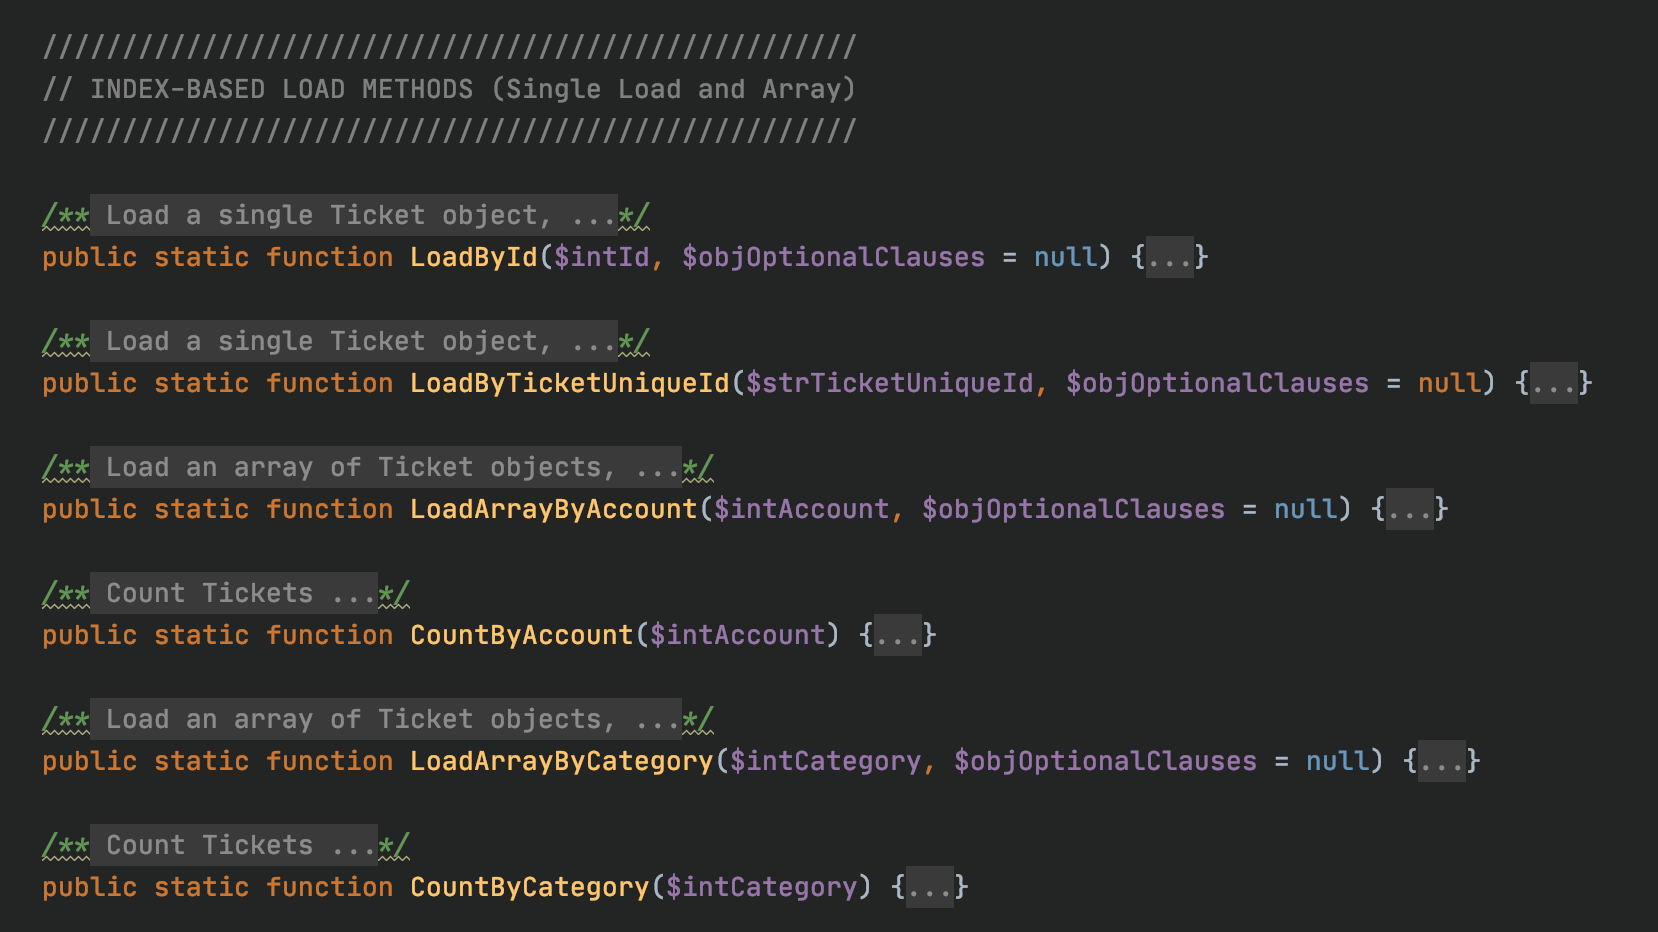
Then there are index-based load methods. It is important to note how types of attributes and data model structure are translated into generated functions.
The LoadById() function is available for all entities, as the ID is a unique field. Since we made the TicketUniqueId attribute unique as well, divbloxPHP allows you to load by
that attribute as well.
We are also able to LoadArrayByEntityName and CountByEntityName for any entities that are constraining the current entity. In our case, we defined a one to many relationship from Account and Category to Ticket,
hence we can load/count an array of tickets constrained by each of these entities.
We are also able to perform certain further actions onto any associated entities as well, shown below for the SubTask and Note entities.

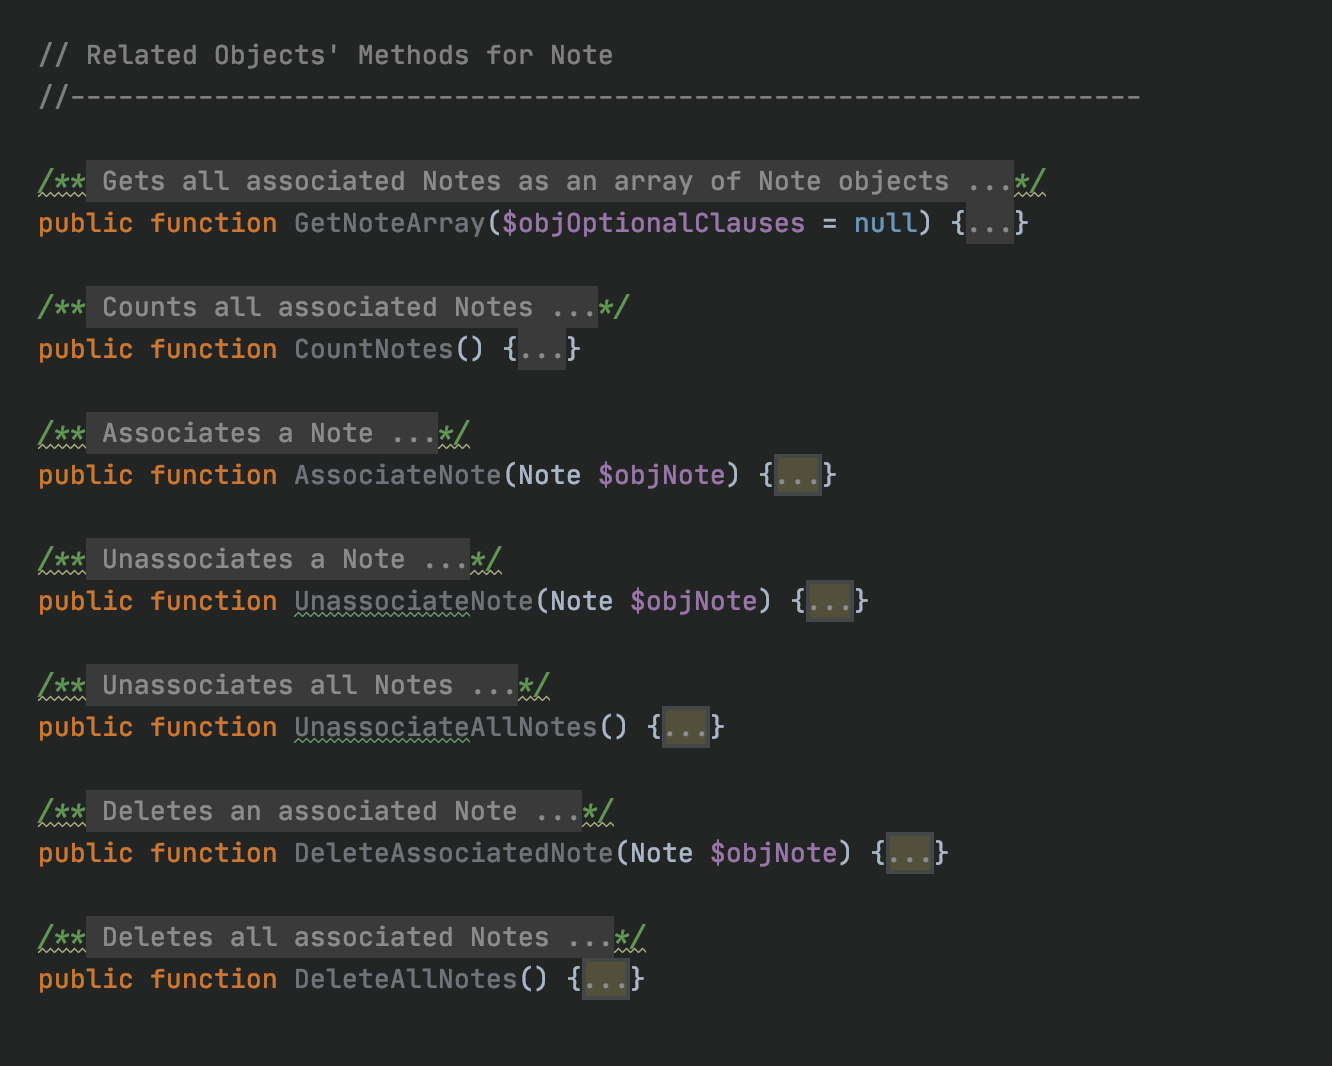
There are more functions in this class, as well as some background divbloxPHP-related query functions which you may look at in your own time.
Back to the topic at hand, once we have defined our endpoint, we can test to see if everything works. Note that this specific API operation updates and
deletes data in our database, so we need to update the Data Model permissions so that 'any' users can 'update' and 'delete'
(Recall that default permissions are only to 'create' and 'read'). The file where we define the data model (database) user permission is
located at /project/assets/php/data_model_role_based_access.php.
We add full permission for the Ticket and Category entities.

Once this is done, our API operation should be set up and permissions for operations granted. We use Postman this time, as it makes it easier to input parameters and has a great user interface.
Step 8 - Further Examples
In the following examples, you will gain a deeper understanding of the divbloxPHP query language that is used to communicate with the database. We will also be building on your existing knowledge on how to communicate between the frontend and backend of your Divblox application.
info
In this section we will focus on the dxQuery language explained here.
You will build the following:
- A custom component that will serve as a container for some example functions. This component will manage the communication between frontend and backend
- Function 1: An example of how to generate dummy data
- Function 2: Basic dxQuery example using
QueryArray() - Function 3: A slightly more advanced dxQuery example using query conditions like
dxQ::AndCondition()anddxQ::Equal() - Function 4: Even more advanced example that makes use of divbloxPHP's wrappers for PHP's DateTime class
- Function 5: Example of building up a query result in a loop
- Function 6: More advanced example of building a query result in a loop
- Function 7: Optimization of function 6
- Lastly, we will optimize our code for extremely large datasets
Custom Component Setup
Create a custom component with two equally sized columns. In the left column we will house three elements, namely a drop down list of functions to select, an additional input box and a button to execute the chosen functionality. In the right column we will just create and empty div with ID = "ResultWrapper" so we can instruct dxRequestInternal() where to display any output. Below is a video walk through of the process:
It is important to create a div in the right column so you can tell dxInternalRequest() where to return any output.
Next, we will set up our component JavaScript to send the selected function (and include the additional output if required) to the backend, and return whatever output the function provided to the front end.
We will again be using the dxRequestInternal function for backend/frontend communication.
The code that replaces the default 3 second loading function for our button is:
We should now be set! Our custom component is ready, our input selection is set up and we have a div to display our output. What remains now is to define our 7 functions.
Function 1
Generate data: This function will generate a bunch of categories & accounts, then it will generate a bunch of tickets, linked to a random category with a random status, account & due dateHere we use the built in PHP function rand(), as well as a bit of divbloxPHP functionality, including the dxDateTime() class as well as the generateRandomString() and generateTimeBasedString() functions. If you are not comfortable with these, you can refer to the class/function definitions.
Every time we run this function, we are generating 500 new tickets, 8 new categories and 50 new accounts. Note that the way we executed our loop, the tickets will not be generated with uniform distribution of categories or accounts, as the oldest generated accounts and categories will be sampled more often. But since we are just doing this to get some data, we are not worried about that.
Function 2
Return all tickets in the category defined by the user in the additional input box. The default category should be 'Personal' if no input provided.Function 3
Return all tickets where the Account's first name is specified in the additional input box (Default value is 'John') and the ticket status is "In Progress"Function 4
Return all tickets that have a status of "Completed" for the current monthThis function is slightly trickier as we are now trying to sort by date. There are many ways to try do this, but we will use built-in divbloxPHP functions to make this easier. The 'trick' here would be to be familiar and comfortable with what dxDateTime can offer you. All we do below is:
- Set the StartDate to today's year and month but manually change the day to 1 and time to
00:00:00. - Set the EndDate to StartDate, + 1 month, - 1 second (which is then just the last day of the current month)
Function 5
Return a list of "Account" full names with a count of tickets that they each currently have "In Progress"In this function we first request an array of all Account objects. We then loop through each of those objects, and fill a key-value pair array as [FullName => NrTicketsInProgress] which is our expected result.
Function 6
Return a list of "Account" email addresses. For each account, show an array of categories. For each "Category" in the array, show the total count of all tickets for that category as well as the count for the specific accountYou will end up with a nested array of objects, structured something like this:
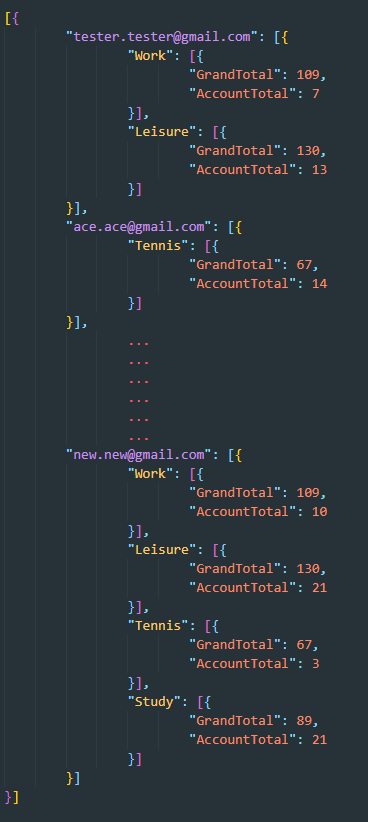
For each account (defined by it's email address) we want to see an array of all the categories used in their tickets. For each of those account-used categories, we want to see both the category's total tickets, as well as the account's category total ticket count.
Function 7
Optimize the query in Function 6 using the Select Clause and by reducing the number of iterations in the loop. You can use your browser's dev tools to monitor the time taken to execute the query.- Select only the necessary attribute from Account entity, i.e. EmailAddress. This means that we are only returning a single column from the database. NOTE: Even though you only select one column, the Account primary key is still included for indexed searching.
- We only calculate the GrandTotal once for every Category, instead of re-checking and re-saving it every time we loop over an account, which has a ticket with said category.
The new code can be seen below:
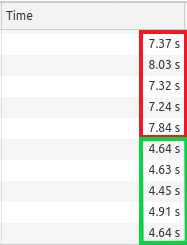
Using the browser's network monitoring tool, the difference with just these minor changes can already be seen. Below is a screenshot of the times taken with the two methods. 5 observations were taken for a better average. There are much better and more in-depth ways to test your code efficiency, but for this example a rough visual difference is all we need. The time taken is dependent on the hardware of your machine, as well as how big your database is. So if your times are different, don't worry, as long as you can see a visible decrease in time taken.
Final Optimizations
In this last step, we will have to change our data model slightly. Let us include the TicketCount attribute into the Category entity, which will represent the total number of tickets in the category in question, and will be updated as tickets are saved and deleted. Using Divblox's data modeller, this process is simple and all the user needs to do is add the attribute and sync to the database, which updates the database and regenerates all the classes and necessary functionality code.
This optimization is intended for when our dataset becomes extremely large, and the cost of making even an optimized query in a loop becomes too high. In this optimization we are focusing on preparing our data for reporting purposes rather than aggregating after the fact.
We will need to write the functionality that calculates the TicketCount into the Save() and Delete() functions of the Ticket ORM class, meaning that any time a ticket is saved or deleted, the TicketCount will be updated. We can do this by overriding their default behaviour defined in TicketGen.class.php (/project/assets/php/data_model_orm/generated/TicketGen.class.php) in Ticket.class.php (/project/assets/php/data_model_orm/generated/Ticket.class.php). We do this in accordance with the Divblox code-generation philosophy: never touch auto-generated files, but rather add functionality in classes that extend base Divblox functionality to prevent loss of work.
The code added to the class Ticket which extends the class TicketGen was:
This is great. Now every time we create or delete a ticket, our counter will automatically update. But what do we do about the tickets that already exist in our database? We will have to create a throwaway script to run once to account for all the already existing tickets in our database.
This script can be saved anywhere and run by going to localhost/[your_project]/[path_to_script]/throwaway.php in your browser. You can confirm that it performed what it was supposed to by checking the category table in phpMyAdmin.
Now, the final step is to go back to our code and just reference the TicketCount attribute instead of calculating the TicketCount total every time. This shouldn't really affect our speed significantly until we have a very large data set, but was included for good practice.
Summary
In this exercise you learned about all the basic elements of a Divblox project. If you understand step 1 - 8 completely, you should have a fundamental understanding of the basics of any Divblox application.
If you would like to receive further hands-on training from the Divblox team, please reach out to us at support@divblox.com and we will arrange a consultation.