2. Starting with VirtualBox
divbloxPHP provides a fully configured VirtualBox image that allows you to start building divbloxPHP apps in no time. The purpose of having this Virtual Machine (VM) is to be able to setup Divblox in a single neat package that is already pre-configured to simplify the installation process. divbloxPHP can also be installed on your local OS (see Option 3. Starting from scratch).
Start developing with divbloxPHP in 3 easy steps:
- Download VirtualBox and the Image containing divbloxPHP
- Import the image into VirtualBox and boot the VM
- Start a new project and configure the API
note
Minimal system requirements:
- At least 30 GB of free storage on your main storage device
- 8 GB RAM (allocating at least 4 GB to the VM)
- Dual core CPU
VirtualBox Download
info
Note: the virtual machine image is a 7 GB download.
The latest version of Oracle's VirtualBox can be downloaded here to ensure that the VirtualBox image runs properly.
The VM (.ova) file that contains divbloxPHP and all the accompanying software can be downloaded here.
Loading the Virtual machine
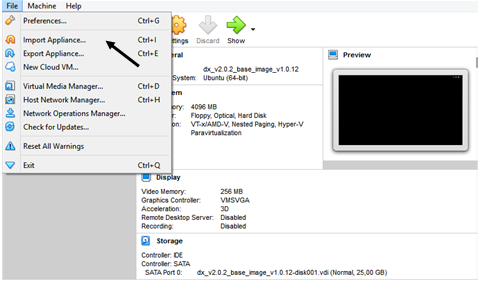
After installing VirtualBox on your device and running the application, add the image by opening "File" -> "Import Appliance".
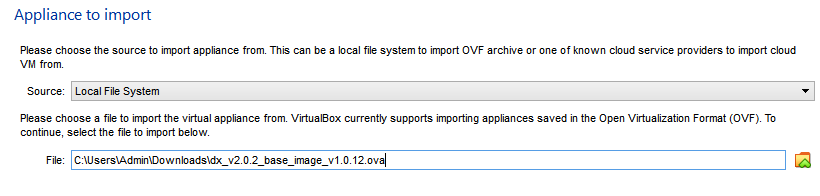
From here, find and add the divbloxPHP VM image file (.ova). On the following window you will be prompted to "Import". Adding the image may take several minutes to install and configure.
Once your VM has been loaded, it can be started by "double-clicking" on the newly added machine in the VirtualBox application. This will open a separate window and begin booting up the divbloxPHP image.
info
The boot sequence is complete when you are greeted by the Welcome page.
Initialize divbloxPHP

The Welcome page is necessary to read through in order to operate the virtual machine. It contains information such as:
- Username and passwords for the VM
- Relevant file locations and permissions
- Quick start links
- Information about the VM software
After you have familiarised yourself with the introduction page, you can open the 'local starter project' from the link located under 'Quick Start links' on the welcome page. This will open up the set up page of a local installation of divbloxPHP (a clean slate for you to work with). You can log in with your Basecamp details.